For those that haven't heard yet, as mentioned last week at their site here, Bethesda has released a High Resolution Texture Pack, that is now available for free, downloadable via Steam.
The graphic 'upgrade' includes 'native 1440p' textures [which means the textures themselves are 2560x1440 pixels in size - but remember, textures usually aren't displayed at Full Size, they are squished into say, the sides of a gun, or a sign or other things in the world - even if they cover a large wall in the game, they will usually not display 'at full native size' - and even if they do, they can be repeated ("tiled") to fill in the space of objects needed, in the game world - basically, 1440p textures should make the game look great]. It also includes Enhanced Draw Distancing and God-Ray tweaks [those glow-y, streaks of light, showing up especially when a source of light is behind something, such as the sun behind trees or buildings].
Now, up until this release, I personally was playing with SweetFX a lot in FO4, having fun increasing Sharpness and Shading, dealing with the Aliasing, taking Screenshots and 'Realistic Photos' and 'Close-Ups' (with Depth-Of-Field, etc) of some of the Characters in the game. These can be found here, at a slowly-growing Flickr page I started for The Blog. A couple examples of these, taken with 'SweetFX in ReShade' are just below - I look forward to what the entire game could possibly look like with the new High Resolution textures!
Fallout 4 - Mrs. Nordhagen, Settler I - SweetFX in ReShade
(GTAMblog7Photo SweetFX Preset, made available Soon™)
Click to see Full Size
Fallout 4 - Mrs. Nordhagen, Settler I - SweetFX in ReShade
(GTAMblog7Photo SweetFX Preset, made available Soon™)
Click to see Full Size
ReShade by Crosire (reshade.me) SweetFX by CeeJay.dk (ceejay.dk) Game Material by Bethesda Game Studios (bgs.bethsoft.com) Captured by Troy from The Game Tips And More Blog
Since I don't actually have room for it on any of the drives I have Games on at the moment [which seems to always happen when something cool comes out, of course], I will be moving some things around and uninstalling other games I am not playing at the moment, to make room for this big fella...
It is an optional/separate "DLC" download, weighing in at a hefty 58GBinstallation through Steam. Once I get it going, I will be working on a QualityTest for it, comparing the graphic look between the twoversions and what they really look like in-game - as well as the Performance Hit the Texture Pack creates - look for that coming post Soon™ if you are waiting to see what they look like or if it is 'worth the download'; but if you can't wait and want to get started seeing it yourself, go get it via Steam for free now, here.
This free download, by the way, is - in Bethesda's own words, "...a love letter to our amazing PC fans that have supported us – not just with Fallout 4, but across multiple decades and games...".
Right back at ya', Beth!
"Thank You" ~ Sincerely, The Game Tips And More Blog
Header and Footer Images captured by Bethesda, from their example screenshots of the High Resolution Texture Pack
[Update 2016-12-05: I think it would be 'more exciting' to see the Before, since these are all the After (the effects were turned on) - I shall come back to this and post/add the Before pics (the in-game unmodified versions), Soon™]
[Update 2017-02-17: I have added an animated GIF showing the Before and After applying my SweetFX profile, configured in ReShade, for one of the screenshots ("Mrs.Nordhagen, Settler II")]
Slowly doing more and more after a harder time with Colds/Flu/etc, I have been having a ton of fun with Fallout 4, ever since I received it as a gift from My Better Half recently when it was on sale - so much so, I can't tear myself away to do a First Impressions on it, I am playing with every bit of energy I get... Although I find myself mainly enjoying just building up my Settlements [as opposed to getting Quests done out in the ruined world, I have managed to take a multitude of Screenshots - and while Fallout 4 does not seem to be a miracle-laden, leaps-and-bounds, rocketship-flight, leap-ahead in graphics advancement from Fallout 3 [it seems to be a heavily modified/improved FO3 Engine], it is still quite beautiful, with the potential to be immensely so. Not a clean-and-crisp representation of a post-apocalyptic future [to my own delight] debris is strewn everywhere in both outdoor and indoor scenes/areas, accented by Shader and Post-Processing Effects galore...all while trying to maintain a lower polygon count ['complexity of the shapes'] for Console (and Desktop) performance. If you are able to turn things up (and don't mind the relatively sluggish performance drops) this game can truly become a Screenshot-Taker's Paradise...
I have so many Screenshots already from it that I want to start sharing them all - but first, here are just a few, of what-I-am-calling "Portrait" ['photo-style'] captures that I was able to take, captured in-game with the ULTRA graphic Video Setting (tweaked slightly), with filtering done by SweetFX in ReShade, utilizing my own configuration/presets/profiles (these Presets are configured with high amounts of Sharpening, Grain and Colour Grading (shading/colour-correction) to produce a darker, grittier look overlaying the game textures). Other than the Picture Frames for the 'portraits' below (those with text) and The Blog logos/watermarkings on all of them, no heavy editing in these (colour changes, etc.) were done outside of the game ("this is how it looks in the game, once you take the Picture Frames or Logos away") - the faces especially, are completely untouched and are how they looked in the game itself... For those interested in reproducing these looks, all SweetFX/ReShade profiles I create/configure will be made available here for all to use, once they are finalized...Soon™
[I am also going to share these Screenshots and 'Portraits' (images with border and text added) at Flickr and through Steam, eventually. I hope everyone enjoys them all!]
And now... a few 'Portraits' and some Screenshots, all taken using SweetFX at the time:
Although I am mostly just building up my Settlements [as opposed to getting Quests done out in the ruined world heh], it is exposing me to the Settlers and their personalities... These "Portraits" [bordered, with green 'Pip-Boy-style' Text] are an expression of those interactions, what I think their personal qualities/goals are (from what I have been exposed to thus far) and my enjoyment of it all... I hope you enjoy these little ‘representational snippets’ of their lives....
Fallout 4
"Portraits" - Preston Garvey
Captured in-game running ULTRA
Settings, no Mods, filtering done with SweetFX in ReShade, text andborder added
Click to see Full Size
Fallout 4 "Portraits" - Marcy Long
(Captured in-game running ULTRA Settings, no Mods, filtering done with SweetFX in ReShade, text and border added)
Click to see Full Size
Fallout 4 "Portraits" - Sturges
Captured in-game running ULTRA Settings, no Mods, filtering done with SweetFX in ReShade, text and border added
Click to see Full Size
"Mama Murphy, can I take a picture of you?" "Oooh I dunno kiddo, noone's gonna be interested in lookin' at ol' Mama Murphy, years from now... Besides, I haven't been to a salon in, oooh, I dunno how long..." "Nonsense, Mama. You look fine. You have a special type of beauty I'd like to capture... Please?" "Oooh alright... Just be sure to get Mama Murphy's 'good side', heheh...."
Fallout 4 - Mama Murphy "From Photo Shoot I"
Captured in-game running ULTRA settings, no Mods, filtering done with SweetFX
Click to see Full Size
Fallout 4 - Mama Murphy "From Photo Shoot II"
Captured in-game running ULTRA Settings, no Mods, filtering done with SweetFX
Click to see Full Size
Although it was hard to get a 'photo-style' angle, interacting with Mrs.Nordhagen (of Nordhagen Beach, Mass.) over and over eventually yielded this somewhat 'candid' shot of her and her husband, after 'talking' to her a number of times to get her to turn around - it was worth it to me, as these next two shots were the result... Lots of filtering was configured in SweetFX, having heavy sharpening and adding lots of colour grading, with a slight vignette [TV style] and Filmic passes, all done with SweetFX via ReShade.
Fallout 4 - "Mrs. Nordhagen, Settler I"
Captured in-game running ULTRA Settings, no Mods, filtering done with SweetFX
Click to see Full Size
Fallout 4 - "Mrs. Nordhagen, Settler II"
Captured in-game running ULTRA Settings, no Mods, filtering done with SweetFX
Click to see Full Size
Fallout 4 - "Mrs. Nordhagen, Settler II" (with and without SweetFX applied), Half-Size GIF Captured in-game running ULTRA settings, no Mods, filtering profile configured with SweetFX in ReShade Click to see Full Size
[I have so many screens already... but I have to get them 'prepped' for Upload and between still being 'slow' - but still trying to enjoy the game as much as I can (taking Notes for a First Impressions post, with Tips, And More!) - the rest will have to come in increments ("Parts"). For now, I hope you all enjoy these though. Take care.]
ReShade by Crosire (reshade.me)
SweetFX by CeeJay.dk (ceejay.dk)
Game Material by Bethesda Game Studios (bgs.bethsoft.com)
Captured/Edited by Troy from The Game Tips And More Blog
I am having a ton of fun playing Battlefield: Hardline, when I can - but while I work on a much longer 'First Impressions and Screenshots' article for the blog, I wanted to share a short tutorial for Newer Players - something that I'm seeing asked in the game chat a lot - how to use the Sabotage gadget (the basics, how to use it, what it does, etc..).
Here then, is my first Video Tutorial for Battlefield: Hardline [hopefully the first of many!]
How To Use The Sabotage (A Mechanic Class Gadget Tutorial)
[Recording utilities used, System specs, music/backing track for the credits,
Just a quick primer for those that don't know; Battlefield Play4Free is a Free-To-Play title, which means it doesn't cost anything to join in, but you can purchase weapons, armor, clothing and other items for Real Money. In this game, you do so by purchasing "Play4Free Funds" that you can then use in the in-game Store. There is also a nice feature offered where you can win 'prizes' (weapons, armor, clothing, etc) from a game called The Daily Draw at the main Battlefield Play4Free website. You can play once every day, choosing a card from a random draw of eight and the card you choose will be an item 'underneath'.
The items possible to win range from temporary one-day-use-only weapons and clothing, to seven-day-use ones, to permanent items your character (Soldier) can use in the game forever (for example, a scope that can be attached to a gun for that soldier for all time). This is great for those who can't afford to purchase many in-game items, as it not only offers the possibility of getting some great gear 'forever', it also gives a nice preview of a weapon, mod or clothing, so that you can see what it will look like/feel like, if you decide to splurge and purchase it for yourself (supporting the game and developers as well) sometime in the future. The Daily Draw also gives a chance to win 'Boosts', where you can earn extra Credits [for instance], as seen in the screenshot below:
The AEK-971 Assault Rifle
I recently won the AEK-971 in The Daily Draw on my Assault class soldier and thought I'd try it out and see how it felt and quickly write a post about it [I call these 'PlayTests']. Now, I am not a gun expert or know a lot about the statistics of the guns, so I will mainly be discussing briefly here how the gun 'feels' and 'plays', especially compared to the default G3A4 Assault Rifle.
The AEK-971 unlocks nice and early at Soldier Level 3, but the main reason for this seems to be that it isn't supposed to be very different from the Default Assault Class Rifle. As you can see from the comparison above, which is the main Store/Inventory screen information for the weapons, the only real difference is the amount of damage it can do. It has the same accuracy rating as the G3A4, the same range, and the same amount of ammo in the mags. After winning it in The Daily Draw, I played a few rounds with AEK-971 and originally recorded a couple of full matches. Here is one full match, shared unedited for you [a 'Raw Gameplay' video], testing out the AEK-971:
I was also testing out the Trial of CyberLink's PowerDirector 12 for editing.
A Review article about that application - with Tips - Coming Soon™!
Despite not being listed as any more accurate than the G3, I felt more 'capable' with the AEK (as though I could 'put up a fight' a lot better), probably due to the increased damage. It feels a little more accurate too, even though it isn't really supposed to be, according to the Store/Inventory info for the gun. So, I figured this is a great time to do some testing![Yay, tests! lol]
AEK-971 Accuracy Analysis
I did some basic analysis on the recoil pattern of this rifle and it is indeed similar to the default assault rifle, but the AEK is ever-so-slightly more accurate, in my opinion. Here is an example of a test I did, a screenshot of the spread patterns, collecting the bullet markings, below:
Coloured spray paint marking the AEK-971's Bullet Spread, on average
(Click to see Full Size)
The left side is the spread while 'shooting from the hip', not using the sights, just standing there holding down the trigger [the spray painted arrow is red-coloured as in, 'try not to do this at all if you can, unless in very close quarters combat']
The right side is the spread while 'zoomed in', that is, using the sights on the gun (it would use a scope if there was one), still just standing there holding down the trigger [the spray painted arrow is yellow-coloured as in, 'try to avoid this']
In the middle is the spread while zoomed in/using the sights, crouching down, still holding down the trigger though - but also now compensating for the recoil of the gun (attempting to contain the spread into a small area) - in this case, slowly pulling DOWN the mouse while firing since the recoil of this gun pulls the barrel UP [the spray painted box is green-coloured as in, it is recommended to do this (even better if you can tap the trigger instead of holding it down)]
As you can see, even though the rated accuracy for this gun is "Low", you can get a pretty decent containment of the spread, by kneeling down, using the sights, and compensating for the recoil by moving the mouse accordingly [this little tip helps with all guns].
In most games, you can try to compensate for the recoil of a gun by slowly moving the mouse in the opposing direction to where the barrel travels. For instance, if the recoil pulls the barrel of the gun left, when shooting, moving the mouse to the right then, will cancel out some of the recoil and make for a smaller spread of bullets and easier/faster repositioning for the next shot. Try to remember that each gun will be different in it's recoil and which direction you should compensate, when using each weapon though. [Note that due to game programmers making bullets 'miss' (no matter what), in an attempt to imitate reality (which has imperfections in the gun and bullets, air changes, etc), it will never be possible to fully compensate/correct for the 'spread' of bullets in a gun (this goes for most games)].
In my tests, the Assault Default G3A4 seemed to pull up and away to the left slightly, when shooting it. Holding down the trigger longer, the gun climbs way up into the sky easily (hence the "Low" Accuracy rating, I assume). For the AEK-971, it does still pull up, but it does not pull to the left in the same way as the G3A4, especially when using the sights. It sort of does a light 'stepping' to the left and then to the right, somewhat randomly [whatever the algorithm is in the programming]. This, to me, makes it ever-so-slightly more accurate in the 'feel' of the gun, because while it still 'goes all over the place' when shooting, it sort of compensates for itself just a bit, and the end result is more of a direct climb up in the recoil, something that felt, to me, easier to compensate for than with the Assault default G3. (I assume this very slight change in the spread/recoil is not enough to win this gun a "Medium" rating in Accuracy, but it is enough to make you have to Level to 3 in order to be able to purchase it..).
Close-To-Medium Range Kill with the AEK-971 in Myanmar. Even with the 'side-stepping' that the gun does (and the enemy strafed around as he ran out towards me from behind the rock in the center of the screen) I still got the kill, mostly due to the Very High Damage Rating of the weapon
(Click to see Full Size)
In Conclusion
Overall, the AEK-971 was similar to the default Assault class rifle, the G3A4, when playing. To me, it did feel slightly more accurate, but not by much. If you are having a really hard time hitting people with the G3A4, your accuracy won't increase very much at all if you purchased this rifle. However, if you are getting used to the default Assault gun, this one packs a lot more punch, and you'll be getting more kills overall if you upgrade to it. Because I recently won this gun Permanently [during the course of compiling this article, yes it does happen in The Daily Draw! woot] I can't see the current price for this rifle anymore, to purchase it from the in-game Store; but last time checking, it was only 300 Credits to try it out for one full day. It was also listed as [what I call] 'Earnable' because, if you can rack up 45,000 Credits, you won't have to pay for upgrading to this rifle with any Real Money at all (you can just use the Credits). If you did buy some Play4Free Funds and have 1,250 to spare, you can purchase it at anytime (not having to wait until Soldier Level 3), permanently. So in closing, PlayTesting the AEK-971, I found it slightly better than the Default Assault Class Rifle, even if it only 'felt' that way due to the higher damage it does.
Long Range Kill with the AEK-971 in Myanmar. The thin iron sights of the gun (default sights) help a lot with targeting farther away. With the Very High Damage Rating - even though the gun has a Low Accuracy Rating - single-shot/tap shooting can still make it lethal at range, when needed
(Click to see Full Size)
Have fun trying it out for yourself sometime and See You In The Games!
Gameplay Disclaimer: Any gameplay videos or animations uploaded are only one example of one possible path of game play and is not representative of the gameplay experience of the entirety of the game material as it is non-repeatable in exactness (movements, actions, viewpoints, etc) to a high degree of accuracy (especially in regards to online multiplayer play and interactions) and therefore is not a representation of a large portion of the game content (this includes complete Walkthroughs/Playthroughs, Raw Gameplay Footage and Tutorials). All material and content uploaded attempts to respect copyright and is presented for Educational and Entertainment purposes only, utilized under Fair Use and can be construed as Free Advertising. No copyright infringement is intended and cannot be inferred. Any possible representation approaching any infringement, to those seeking infringement action, requires double notification and will be honoured by permanent removal of the infringing material. This information exists for entertainment and educational purposes only and is not a substitute for medical attention.
Battlefield Play4Free is a Free-To-Play title, where it doesn't cost anything to join in, but you can purchase weapons, armor, clothing and other items for Real Money by purchasing Tokens (now called Play4Free Funds) that you can then use in the in-game Store. There is also a nice feature where you can win prizes (weapons, armor, clothing, etc) from a game called The Daily Draw, where you choose a card from a random draw of eight and it will generate an item for you.
The items range from temporary one-day use weapons and clothing, to seven day usage, to permanent items your character (Soldier) can use in the game forever (for example, a scope that can be attached to a gun for that soldier for all time). This is great for those who can't afford to purchase many in-game items, as it not only offers the possibility of getting some great gear 'forever', it also gives a nice preview of a weapon, mod or clothing, so that you can see what it will look like/feel like, if you decide to splurge and purchase it for yourself (supporting the game and developers as well) sometime in the future.
I recently won the XM8AR in The Daily Draw (for one day of use) on my Medic and thought I'd try it out and see how it felt and quickly write a post about it [I'll call these PlayTests]. I am not a gun expert or know a lot about the statistics of the guns, but I will discuss briefly here how the gun actually feels and plays, especially compared to the Medic default, the MG3 Light Machine Gun. I played a few rounds with XM8AR LMG and recorded the first three full rounds. Here they are, shared unedited for you [a 'Raw Gameplay' video]:
Recorded with: Bandicam @1080p (HD) using the x264/H264/AVC Codec
Recorded game: Battlefield Play4Free (MMOFPS, a F2P game/Microtransactions)
Recorded levels/maps: Myanmar (Jungle, Assault), Dalian Plant (Rural Industrial Port, Defense then Attack)
[YouTube did something with the Aspect Ratio of this video and I had to use a command in the Tags section to fix it. Let me know if anyone has problems viewing this video properly]
Normally locked until Level 15, the XM8 felt great to use on my Level 10 Medic. It's ammo box is a little smaller at 60 rounds (vs. the default Medic's MG3 having 80 rounds), but it never felt 'cramped for shots' and didn't feel like it took too long to reload.
The XM8AR Light Machine Gun is normally locked and cannot be used until your Soldier is Level 15, unless it is bought outright or won in The Daily Draw. Click to see Full Size
The nicest thing about the XM8 was the accuracy. You could really tell you were going from the "Low" rating of the Medic Default MG3 to the "High" rating of the XM8AR.
Comparison of basic stats between the default Medic gun, the MG3, and the XM8AR
Looking down the sights, the three-prong irons of the front sight are quite thin and easy to line up in the view of the rear sight, which is in the form of a circle. There is only a little bit of a pull up and slightly to the right, but the recoil is very small and easy to compensate for once you get used to it. I even felt comfortable shooting from the hip and at a distance because this gun felt so darn accurate compared to the starting weapon for a Medic.
The thin front prongs of the iron sight feel easy to line up for targets farther away and the XM8AR feels like it is very accurate, as can be seen by this Headshot from across a courtyard in Myanmar. Click to see Full Size
An all around great gun, it was fun as hell to use for a day. For only 300 Credits you can try out for a day of play, too. If you have 1250 spare Play4Free Funds you can purchase it permanently. It is a nice accurate gun to run with and may be worth it. Try it out for yourself sometime.
Have fun and See You In The Game!
Disclaimer: Any gameplay videos or animations uploaded are only one example of one possible path of game play and is not representative of the gameplay experience of the entirety of the game material as it is non-repeatable in exactness (movements, actions, viewpoints, etc) to a high degree of accuracy (especially in regards to online multiplayer play and interactions) and therefore is not a representation of a large portion of the game content (this includes complete Walkthroughs/Playthroughs, Raw Gameplay Footage and Tutorials). All material and content uploaded attempts to respect copyright and is presented for Educational and Entertainment purposes only, utilized under Fair Use and can be construed as Free Advertising. No copyright infringement is intended and cannot be inferred. Any possible representation approaching any infringement, to those seeking infringement action, requires double notification and will be honoured by permanent removal of the infringing material. This information exists for entertainment and educational purposes only and is not a substitute for medical attention.
Just a quick tip for Rollercoaster Tycoon 3 (and any Expansions you may have installed): To change the resolution to match your monitor's native rez or to bump it up higher, simply edit the Options.TXT file found at
Computer > [WindowsDrive] Disk C > Users > [UserName] > AppData > Roaming > Atari >RCT3
(See the screenshot just below, my 'username' was "Tr")
The location of the Options text file that allows you to edit the resolution the game will run in (Windows7)
Another way to get to this location in Windows is:
Click on the Start button, then click on Run [or press 'WindowsKey+R']
In the command box that comes up, type "%appdata%" (without the quotation marks) and it will open Windows Explorer at the folder >Roaming - then all you need to do is navigate into the Atari folder, then within that, the RCT3 folder - and you will be at the same location as the above, where the Options.txt file can be found
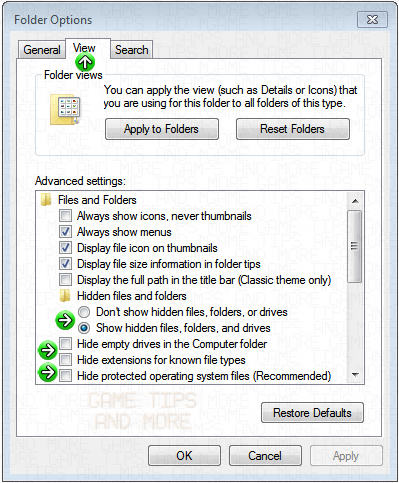
Note that you may have to show Hidden Files in Windows in order to see some of the folders (such as AppData). To do this:
In Windows Explorer, click on the Tools pulldown menu and select Folder Options.
In the Folder Options window, click on the View tab
In here, under the Advanced Settings section, where it says 'Hidden files and folders', select the 'Show hidden files, folders, and drives' Radio Button
Also, take out the checkmarks for the next 3 'Hide' selections (Hide empty drives, Hide extensions and Hide protected files)
Here's what the checkboxes, etc look like:
After the steps above, you should be able to now navigate to the RCT3 folder that has the Options.txt file with the resolution setting inside (open it with Notepad or your favorite text editor). You'll see the setting near the beginning of the file. Simply change those numbers to the resolution you wish to use - that's all.
In an earlier post about game recording with H.264/AVC (MPEG-4 Part 10) here, I went somewhat in-depth about concepts and considerations for the various settings and why you might want to use them or leave them as they are. With plans to make a "short version" of why you might want to use some settings over others (and setting recommendations geared more towards Speed of recording, reducing lag/choppiness) in the near future, for now, enjoy this short sampling of some game recordings done with H.264/AVC - this time with the goal of increased Quality in mind as well - showcased using four different games and presented in 2K Resolution (2048x1152p):
Clicking the Gear icon in YouTube's player and choosing 'Original'/1440p, while still Youtube-recompressed, is the closest to the original upload in viewing quality (You may need to click on the YT logo and watch it at YT to enable the Quality Setting)
Recorded games:
Battlefield 3 (Grand Bazaar), Planetside 2 (48+ Players Per Side in a BioLab territory, Night), Hitman: Absolution ('Run For Your Life, Shangri-La'), Grand Theft Auto 4 (Broker area, Night)
These games were selected because I felt they created a good 'obstacle course' for this codec Test, with light and dark areas, large panning/movement areas and hard edges to deal with, either from on-screen text or finely detailed textures [all Texture Filtering was turned Off in the Videocard Control Panel settings] (they were also all relatively demanding games, showing then, the low performance hit of this codec, with these settings)
Recording codec:
H.264/AVC configured with the x264 Video For Windows Unofficial (Black Logo) interface (the XiWave GNU GPL MPEG-4 Codec)
Recording settings:
CRF18, NoPartitions, Fast P-Skip, 1 Reference Frame, Diamond ME, ME Range 4, Subpixel ME 1, GOP 1 (for editing with Vegas/Premiere), NoWeightedP-Frames, No B Frames, Deblocking Filter (Strength 1), Non-Interlaced, No CABAC, DCT Decimation, No Trellis, Deadzone (11,21), Flat Matrix, MaxBitrate 50000k (Buffer 5000k), Threads 4, all other settings left as Default/Off
Recording compression:
Originally recorded @ 50000kbps, H.264/AVC format @ HD Resolution (1920x1080p)
Compressed @ 25000kbps for smaller upload to YouTube, WMV format @ 2k Resolution (2048x1152p), in attempt to keep detail/compensate for YT recompression
[The 'analog pause' effect wasn't added to accentuate any specific action going on at the time, it was more to showcase the detail maintained at that time/frame, when recording with the h.264/AVC codec]
At a max bitrate of 50000k (a high quality Blu-Ray movie bitrate), the original recorded output takes up about 375MB per minute of recording. For an hour of gameplay, that's less than 25GB (including uncompressed audio (uncompressed to be more compatible with video editing apps and use less CPU resources while recording)). Maintaining good quality - although quality is relative, mind you - that is still about one-tenth the filesize of a FRAPS1 codec recording or a YUV or Lagarith codec recording. Chalk it all up to a powerful codec that has the ability to not only compress more where it can (without over-compression in dark/flat or low-motion areas), but also compensates for its' own compression via Deblocking and other built-in techniques.
Doing a quick test without the self-compensation capabilities found within the codec (turning off Deblocking, CABAC, etc), the output has macroblocking and other artifacts occurring, as can be seen in this screenshot:
An example of the internal filtering/compression-compensation found within the h.264/AVC codec, two frames taken directly from two h264/avc recordings, done one after another in the same area in the same online game
(Rift, recorded @ 1080p).
Click to see Full Size (cropped and zoomed source)
The two frames above are from videos shot close together in time, at the same bitrate, resolution, everything... The only difference between the two is that the left side has all filtering/compensation for compression that the codec can perform 'OFF' and the right side has CABAC, Deblocking and other compression/correction techniques 'ON' (Deblocking within the codec was set at only +2+0, as higher Deblocking settings have the effect of excessive smoothing.. [but if you don't mind that or you like the look of it, you can turn up the Deblocking to a maximum setting of +6+6, with a small hit to recording performance]).
These powerful compensators for compression come at a tradeoff however, as the more that you turn on, the longer the codec will take to scrutinize the frames and the slower the compression/output will be. This results in 'lag' both in the game and in the output video, as the resources of the system are directed more towards analysis and compression of the recording, where doing the calculations on the frames, then writing them to disk, can cause the recording to fall behind what is actually occurring on the screen. Also, turning up too many compensators/filters within the codec can result in a 'washed-out' (or at least excessively-smoothed out) video, meaning higher loss of detail.
So, are you stuck with only either crappy looking video or too-smoothed-out video output? Not at all. There are two main directions you can go with your h264/avc game recording (which one you decide on is limited somewhat by your system capabilities):
On the one hand, you can have small filesizes, allowing you to record longer and more video. You can turn up the analysis and compensation techniques within the codec (Deblocking, Motion Estimation, CABAC calculations, Partition Analysis, etc) - as much as your system can handle, but not too much or you risk excessive smoothing, lag and other effects - and still end up with good quality game recordings.
On the other hand, you will have larger filesizes, but if your system cannot handle the extra analysis and calculations of the codec, you can turn off these compression/compensation techniques and also gain more speed/performance [less 'lag' during gameplay and in the video output - this may also result in more detail being kept from the original source]. All you have to do is allow more Bitrate (setting a lower CQP or lower CRF, if you are using those) to more accurately represent what is occurring on-the-screen/in-the-frames, so that you don't get compression artifacts (as in the left portion of the screenshot above) - and still end up with good quality game recordings.
What settings to use, then? I will present the settings I settled on, after much testing; but again, these were done on my system, with the limitations that includes for me. You may have a more powerful or lesser so system, but all it will take is a few tests, changing a few settings each time, to see what kind of quality you can arrive at, with the balance/tradeoff of performance hit you are willing to tolerate.
Although JPG-compressed for posting, it can still be seen in this frame extracted directly from the H.264/AVC game recording (Hitman: Absolution @ 1080p), that decent quality can be maintained, despite the ability to record in smaller filesizes, with this codec and these suggested settings for the x264 interface.
Click to see Full size
There was only a light performance hit for my system with these upcoming settings, usually only a couple frames per second (averaging about 5fps loss, depending on the game/area being played); but it may depend on the 'overhead space' that you have running a game already. What I mean is, if a game is already chugging along for you, you may not be able to use or turn many things on with this codec (it can be much more demanding, as the different processing options get turned on). Along that same line of thought however, if you are able to run a game you want to record smoothly already, you should have no problem trying out this codec (esp. with my suggested settings). Since that was the case with many of the games I was playing with at the time [although games like GTAIV are always choppy haha], I will list the basic system specs that were used during the time of this Test:
AMD FX-6100 CPU @ 4.0GHz
AMD/ATi Radeon HD 6870 GPU (1GB VRAM) @ 950MHz
16GB Patriot "Gamer" RAM
all on a Gigabyte 990FXA Chipset Mainboard
running Windows7 64-bit
recording to two SATA III harddrives set up in RAID 0 (~233MB/s throughput, according to Dxtory)
I also managed to perform these couple of quick tests, as a comparison of the performance hit to be expected when recording with this codec and these settings on some other systems (CPU/GPU combinations listed):
Unigine Heaven Benchmark
6-core CPU / HD 6870 GPU ~1-3fps
4-core CPU / GTX 560 Ti GPU ~3-5fps
2-core CPU / GTS 250 GPU ~5fps
Rift (Online MMORPG)
6-core CPU / HD 6870 GPU ~1-3fps
4-core CPU / GTX 560 Ti GPU ~ 5fps
2-core CPU / GTS 250 GPU ~5fps
Not bad, in my opinion. These settings seem to work well, no matter what combination of hardware there was. Hopefully this will be the same for you, dear reader.
So then, just below are the settings I normally use when recording with the H.264/AVC codec. I might change things a bit for certain games that look vastly different, such as, if I wanted to keep the grain in the Left4Dead series of games or if I was recording a solid-coloured/static-area looking game like Minecraft or Web Browser games. For the most part however I use these settings, both for maintaining good quality and keeping disk space usage relatively low (at least, far lower than using the FRAPS1 codec, Lagarith, or a YUV codec).
[Note that I have chosen to use a GOP (Group of Pictures (Frames) (called "keyint" in the bottom example)) of "1". This is for editing compatibility with Vegas/Premiere and is optional if you are not using these video editing applications. Feel free to change the "1" in this setting to the Codec Default of "250", or as desired. For more information on this, especially if you plan to edit the recordings with Sony's Vegas or Adobe's Premiere lines of products, see this post earlier, here]
When using the 'Unofficial' (Black Logo) x264 Video For Windows interface to configure settings:
When using the 'Official' (Red Logo) x264 Video For Windows interface to configure settings:
For the official/redlogo interface, choosing the Ultrafast Preset configures many settings that are the same as the above prior three screen captures, seen using the unofficial/blacklogo interface. The command line area (box at the bottom) where things are typed in, change the remainder of the settings so that they end up the same as the other interface settings in the prior three screen captures above.
As you can see, these settings can be configured using the x264 interface for the codec, so no matter what game recording program you use* - be it Dxtory, Bandicam, MSI's Afterburner, etc - you will be able to choose these settings, adjusting for your own tastes as you prefer (or adjusting to be within your hardware limitations).
[*The game recording application must be able to use 'external/third-party codecs', i.e. other codecs not included with the program itself, that you have installed on your system, in order to utilize the x264 interface for the h264/avc codec]
For more detailed coverage of the settings used when recording with h.264/AVC [in an article that focuses more on speed of recording, reducing 'lag'/choppiness], where to download the codec/interface and how to start using it in Dxtory, Bandicam and MSI's Afterburner, see this earlier post here at the blog: http://gametipsandmore.blogspot.ca/2013/05/game-recording-with-mpeg-4-using.html
Please note dear reader, that I am not saying "This codec is the best one to record with" or "use this one only".
I am merely showing that it is possible, or how to tweak it for quality or file size, as to your own personal preference.
There are many codecs out there to choose from when game recording and although some are more apt for certain types of games than others, overall it is your own choice to use whichever one you prefer. Do some short tests and see which one works best for you and your current system - and try to have fun with it
Have Fun Recording with H.264/AVC and See You In The Games!
Battlefield Play4Free is a Free-To-Play title, where it doesn't cost anything to join in, but you can purchase weapons, armor, clothing and other items for Real Money by purchasing Tokens that you can then use in the in-game Store. There is also a nice feature where you can win prizes (weapons, armor, clothing, etc) from a game called The Daily Draw, where you choose a card from a draw of eight and it will generate an item for you.
The items range from temporary one-day use weapons and clothing, to seven day usage, to permanent items your character (Soldier) can use in the game forever (for example, a scope that can be attached to a gun for that soldier for all time). This is great for those who can't afford to purchase many in-game items, as it not only offers the possibility of getting some great gear 'forever', it also gives a nice preview of a weapon, mod or clothing, so that you can see what it will look like/feel like, if you decide to splurge and purchase it for yourself (supporting the game and developers as well) sometime in the future.
In this video, I present 'Raw Gameplay' (unedited gameplay) of BFP4F after winning a Saiga-12 Shotgun for one day's usage on my Medic via The Daily Draw. I had joined a 32-player server (running a Rush map) that was nice and full (16 soldiers per side). After getting the kinks out and getting used to the controls again after not playing for a while, I think things picked up as the game went on.. I was soon having fun arming MCOMs and healing and reviving. Near the end, I realized that my Aircraft controls weren't set/got reset, as my mouse wasn't 'inverted' and I couldn't fly the helicopter at all, haha.
Recorded game: Battlefield Play4Free, Online FPS
Recorded with: Bandicam (Registered Version) @ 864p
Recording codec: MPEG-1, 70% Quality, 30fps
This video was also a test of a few things (though not an 'Official Testing Video'): I was messing around with different settings (resolutions, quality settings) to see how low I could set things before the quality suffered too much. This is of course, something VERY relative and what looks 'good enough' to one person, looks 'like crap on a cracker' to another person. What I was testing here was, what seemed good enough to upload to YouTube (since it recompresses anyway) and still be enjoyable, while making the recorded file as small as I could via Quality settings (which limits the bitrate somewhat) and resolution size (the larger the resolution, the more bitrate/filesize that would be required).
As I have stated in earlier articles talking about Quality, Bitrate and Filesize, I still find that going below 60% produces too many compression artifacts (macroblocks and 'trails', Gibbs effects and more) for many games, especially if there are large dark areas (which would get compressed more highly and have these compression effects occur in them). This doesn't happen with all games however; some games are fast-moving and/or do not have many darker/flatter areas and using 50% quality doesn't look too bad, even with the MJPEG codec. It's a balancing and testing game, as some games (especially with text) look fine and others look very bad (the compressor will try to allocate more bits around edges like text and compress even more highly then, the flatter/darker areas in a scene). I have done recordings of news streams and other things however, that allow for a very low quality recording setting (down to 20%), but that is mainly because the source itself is of a low quality (many streams are highly compressed and there is not much 'extra' compression artifacts produced by recording it in a lower quality/bitrate, especially if you are going to downsize for the final output video).
For most games, I found I could go down to 70% Quality comfortably - as long as the resolution stayed 'higher' [720p or higher]. With lower resolutions, the bitrate/quality reduction means too many 'casualties', as 30% of a 1080p recording isn't that many pixels when you consider the screen size; but one-third of a 480p recording is a huge amount of the already small screen being 'lost' to compression. Thus, with some testing (again to what looks "ok to me") I arrived at a middle ground of 864p, which maintains decent clarity of text and is large enough to discourage overcompression of darker/flatter areas. For keeping recorded files small and downsizing to 720p HD, it looked fine to me in tests - and on some games, doesn't look that bad even if you wanted to upsize to 1080p HD (clear text was maintained, etc).
So, enjoy this first installment in an 'unofficial' Video Series here at The Game Tips And More Blog: "Raw Gameplay" of Battlefield Play4Free. If you like the game, play it, tell others about it and buy some stuff from the Online Store and support it!
See You In The Game!
Any gameplay videos or animations uploaded are only one example of one possible path of game play and is not representative of the gameplay experience of the entirety of the game material as it is non-repeatable in exactness (movements, actions, viewpoints, etc) to a high degree of accuracy (especially in regards to online multiplayer play and interactions) and therefore is not a representation of a large portion of the game content (this includes complete Walkthroughs/Playthroughs, Raw Gameplay Footage and Tutorials). All material and content uploaded attempts to respect copyright and is presented for Educational and Entertainment purposes only, utilized under Fair Use and can be construed as Free Advertising. No copyright infringement is intended and cannot be inferred. Any possible representation approaching any infringement, to those seeking infringement action, requires double notification and will be honoured by permanent removal of the infringing material.
In this brief Tutorial focused on New Players to Planetside 2, I present concepts to attacking and defending a large facility with multiple objectives, such as:
capture points
shields
generators
spawn rooms
terminals
and more...
In the video below, I am playing on the New Conglomerate FACTION. I CAPITALIZE full words that are either important structures and names to remember, or are important concepts to learn for battle.
During this battle at a large base, I show briefly how to use your HUD (Head Up Display) to locate OBJECTIVES, what some icons on the screen represent, where major structures are and important areas and aspects of the base.
Although my FACTION successfully takes over a Bio Lab, many of the concepts presented in the tutorial will carry over to battles at other large facilities, such as Amplifier Stations and Technological Plants.
[A separate tutorial for an Amp Station can be seen here:
With subtitles over sections of a Bio Lab battle, playing as the NC (New Conglomerate), I go over some concepts a few times to make sure they set in for New Recruits, but for the most part, I stick to the main objectives of the base and how to quickly locate them, as well as the various ways to get inside..


%2Bby%2BThe%2BGame%2BTips%2BAnd%2BMore%2BBlog%2B(720p).jpg)
+HEADER-tGTAMb+2++.jpg)


+-+Myanmar+Shrine+Trio+-tGTAMb.jpg)
+version+2+-+for+YouTube++.png)




+tab+1.PNG)
+tab+2.PNG)
+tab+3.PNG)
+GTAM+settings.PNG)
+version+1+.jpg)
+++-GTAM.jpg)