Showing posts with label howto. Show all posts

Tuesday, June 25, 2019

No Man's Sky - How To Play The Game In 'Single Player Mode' [Tutorial Steps]


Playing some No Man's Sky again recently [which by the way, is a great game now, with Base Building, Underwater Exploration, more Quests and Factions and 'things to do'], I also saw a question in the Steam Discussion/Forum for the game, where 'playing NMS as though it was a Single Player game' was being talked about. Wanting to help, I took a Screenshot of the menu options that need to be configured, to set up the game as though it is Single Player (essentially turning off all Joining and Multiplayer Options). Here is what that menu looks like, configured as such:

Example, Unedited - How to set up the game to play as a Single Player experience
(Network & Voice Menu)
From my own Steam Screenshot, found at:

To get to the above menu, in No Man's Sky, just hit ESC (Escape key) at any time after Loading into your Game/Profile, then select the "NETWORK & VOICE" menu. Once in there, you will see the options shown above. Configuring it as shown, noone will be able to join your game and noone will be able to chat/talk with you in the game.

Personally, I prefer to play almost all games as though they are Single Player experiences (eg. World Of Warcraft, The Elder Scrolls Online, et al.) running around on my own, doing what I want to do at any time; but I do not mind Multiplayer and PvP games - I have played many in the past, such as Overwatch, League Of Legends, Starcraft and shooters like Planetside 2, Tribes Ascend, the Battlefield Series and older ones such as Unreal Tournament (1999), Quake 3 and more... I simply prefer to explore around at my own pace in most games, stopping to enjoy the sights and take Screenshots, listen to the wind in the trees and the animals around, and so on - I feel that stopping so often may hinder the experience of others that may in the game, so I usually play by myself; that way, 'everyone' is happy (mostly, heh). This post was created mostly for others like me, or those that just want to play without worrying about other people for a while. When I myself do play Multiplayer games, perhaps I'll see you in them, sometime.

HTH and take care. Good Journey, Traveller.


Thursday, August 20, 2015

Quick Tip, Fix: No Audio Recorded in Windows 10 with the Game DVR Recording Application [with Video Tutorial, List of Steps and Example of Result]


So, I upgraded my system to Windows10 and have been using it for a couple of weeks now (and was part of the Beta before that). One of the things I was doing, was testing out the Windows built-in game recording program "Game DVR", to see if could be a replacement for third-party game recording applications (such as MSI Afterburner, Bandicam, OBS and others). I am currently working on a longer Quality Test article, going into detail about Game DVR and the recording output it produces and comparing it to other game recording programs and codecs - however for now, I quickly wanted to share a fix I found for a problem with Game DVR in Windows 10 (which I saw that many online were running into as well), that capturing with the Game DVR app results in no sound/audio in the output file - even if the Audio Setting is "On" in the Settings for Game DVR (shown just below):


The Audio Settings for Game DVR in Windows 10, showing the Audio as being Enabled

At first, nothing I did locally on the system seemed to alleviate the issue. Game DVR was recording only video, no audio, in any and all games and applications [there was literally no Audio Track within the recorded/created file]. Sound was working on the system, I could hear everything - it just did not get created within the output file, produced by Game DVR when I hit "record". I quickly wrote a Quick Tip about how I found a temporary Workaround, posted here at the blog, where I used a Secondary Audio Device to get it to record audio. However, most users I believe, will not have a second audio device available, desiring to use the built-in (onboard) audio adapter on their motherboard - and so this was not a "true 'fix'", at the time...

To make a longer story short for this post [I realize I tend to ramble on, whether it is to help explain something or get off track, thank you ADHD!], after working on this problem off and on, I finally found more of a real answer, via a Microsoft Support Engineer's Tip on the Official Microsoft Forums to try the How-To page on Fixing Sound Problems for Windows 10, located here:

http://windows.microsoft.com/en-us/windows-10/fix-sound-problems#v1h=tab01

Which led to:
Above, is a short 'Minute Tutorial', showing a
walkthrough of the steps listed below


These are the steps it eventually took to get Game DVR to record audio in Windows 10:


  • Open the Device Manager for Windows by clicking on the Start Menu (in the lower-left corner) and in the Search "the web and Windows" area, start to type "Device Manager" (without quotation marks) - a prediction menu should show up, displaying "Device Manager" at the top. Click on it to launch the Device Manager interface.
  • In the Device Manager window, expand the category "Sound, video and game controllers" (which lists (among other things) audio devices installed in the system and useable by Windows), by clicking on the ">" arrow next to the title of the category.
  • Right-click the audio adapter you wish to use as your main audio recording device for Game DVR.
    In this case, I wanted to use the built-in (onboard) audio adapter called "Realtek High Definition Audio". A submenu will pop-up, showing "Update Driver Software", "Disable" and "Uninstall", among other choices.
  • Select the choice "Update Driver Software" by left-clicking it.
  • In the "Update Driver Software" Wizard that pops up, choose "Browse my computer for driver software".
    This is because, if your audio is working properly already (you can hear audio - but can't record it in Game DVR), there are already Drivers installed for the audio device ['Drivers' are System Files that Windows uses to "talk to" and use the device] and we want to Update/append them.
  • In the next window, choose the option to "Let me pick from a list of device drivers on my computer".
    This will list installed/found Drivers that your hardware/device can utilize. It should list your audio device and Drivers for it, as shown below.
  • Choose a more recent version/dated Driver for your audio device, if there is more than one listed and click on it.
    If there are only two items (eg. "High Definition Audio Device" and something else that is your audio device), choose the one that is more specific to your hardware (containing the name of the device, etc).
  • Click "Next" to advance the Driver Software wizard.
  • A warning may be displayed, informing you that using the chosen Driver is not recommended because Windows has not verified it will work with your hardware.
    Do not worry, this message is mainly stating that Microsoft has not had a 'chance to officially test' your audio hardware with Windows 10 yet, informing you of this as a precautionary measure. What we want to do is, allow Windows 10 to utilize the Drivers we have installed in the system for the audio device (as opposed to a Windows 10 'generic driver' for the device). 
  • Click "Yes" to try using the installed Drivers for the audio adapter (and no longer use the Windows 10 generic drivers for it).
  • The Driver Software wizard will complete and list your audio device. Click "Close" to exit the window/wizard.
    It may inform you that you have to Restart your system to properly initialize the audio device and load the Drivers for it in Windows fully.
  • Restart your computer to re-initialize the audio device and load the Drivers for it in Windows fully.


Now, you should find that the Game DVR in Windows 10 records a proper audio track, creating it within the recorded file, giving you full game recording audio!


Below, is an example of testing the new configuration with Game DVR, immediately after restarting my system (using the PC Gamer Minecraft Demo as a test) - note that this is not a 'tutorial', it is merely an example of Game DVR properly working with audio, after taking the steps listed above:


Hopefully it will work for you, dear reader, as it did for me.

Good luck with it - and See You In The Games!


Saturday, June 13, 2015

MSI Afterburner and AMD Gaming Evolved (Powered by Raptr) - Working Together In A Tense Harmony [Tutorial Of A Workaround]

I have been using Raptr (the AMD-Sponsored version, called AMD Gaming Evolved) for a while off and on, more dedicatedly since December now and have been having a lot of fun with it. In this article, I'll show my 'Workaround' steps for getting MSI Afterburner and Raptr (G.E.) to work together. It's odd, but it's easy. Enjoy.

There are a bunch of reasons why gamers would want to run MSI Afterburner along with Raptr/GamingEvolved: the added Overclocking capability, Fan Control, Buffered Gameplay Recording, and more.

At first, I noticed that when trying to run MSI Afterburner, together with Raptr/GamingEvolved, they both just looked at each other and said, "Nuh-uh.." and walked away... sometimes taking the game with it. After looking it up online, it seems that many people have wanted this and had this problem. So, I took it upon myself to see if I could find a Solution (or at least a Workaround) for this odd interaction - and I did!

I share it with you now, my dear readers and fellow gamers, so that you can utilize the potential of these two programs together (and mention the steps for the workaround, in hopes that it will help the Developers of these useful applications possibly ease their mutual tension between them, in future updates, perhaps).

Short Version first (for the impatient or those that "just want to know c'mon", and those with ADHD - both parties of which I belong to myself), then a Long Version, explaining the steps further and possible reasons why this entire interaction may be occurring:


Short Version


  • Run RAPTR_GE (set the Overlay for any corner but the Upper-Left)
  • Run Game (wait a moment to let the Overlays for RAPTR_GE load, if Enabled)
  • Run MSI_AB (which Defaults to using the Upper-Left for its Overlay)
  • Sit With  Mouth Open For A Moment


Long Version


Here are the steps I found for getting Afterburner and Raptr working together in a tense harmony**, figured out after much testing of settings, and games, and reboots, and re-installations, and more...

Initially, I found it ran much better while running Bandicam (in the background, not 'doing anything' with it); but after updating all three programs and GPU drivers since beginning Testing, it seems that the extra step of running Bandicam (and having it just sit there) is not needed anymore. So, here are the 'New and Improved', simplified steps for getting these two useful programs to work together:


  • Run AMD Gaming Evolved / Raptr and Login
  • Make sure MSI Afterburner is not running
  • Run your game
  • Let AMD Gaming Evolved / Raptr load its Overlays
    (I suggest the Lower-Left corner (I used that for testing the below games), but eventually tried the Lower-Right as well, and I believe any will work, as long as it is not the Upper-Left corner [as MSI Afterburner uses that region for its Overlay by Default])
  • Run MSI Afterburner and choose/have your settings for Fans, Overclocking, Gameplay Recording,etc
  • Go back to your running game and let these programs detect the game and load up fully
    (you should see the MSI Afterburner overlay [by Default, in the Upper-Left] and the Raptr/GE overlay load in its corner you selected - and you should now be running Afterburner and Raptr together!

  1. Note that some games can have MSI Afterburner running already (I have noted some below, in a list); but for the most part, it will result in either the GamingEvolved/Raptr GameDVR not loading, or the game simply crashing [at least, it did in my testing].
  2. Note also, that you should try not to lose Focus of the game (ie. don't ALT+TAB out of the game or click outside of the window if in a Windowed Mode) or close any of the programs (eg. don't close MSI Afterburner and leave your game and Ratpr/GE running - it will likely crash the game [at least, it did in my tests]).

That's it!


Hopefully, you are now running MSI_AB and RAPTR_GE together, seeing the overlays for both and are able to have the benefits of both; Buffered Game Recording, Game Time Tracking, Fan Control, and even Overclocking.


Note: If running the RAPTR_GE recording buffer and the MSI_AB recording buffer at the same time, game performance will be affected - but it is possible if you wish to do so - I did it in my Testing.


Now, I am not a Programmer, nor am I a Developer for any of these programs or companies; so I am not 100% sure why this 'works'. It seems to be mainly a Workaround [to me], as it should not require running a multiple almost-competitor programs, with seemingly-close functions/overlays/etc all at once [and initially, Bandicam had to be running in Minimized mode]. The only reasoning I can find (in my superficial estimation), is that there are functions/calls that the programs are making that interfere with each other 'just enough' to make this all work together in a 'tense harmony'**. I say this because it does not work near as reliably, if you run MSI Afterburner first, the games first, or other variations of this.

[At least, it did not work those ways on my system, at the time of this writing and testing - I realize that every system configuration is different, and offers differing obstacles to these two programs working together. I feel it is an immense task as it is, to have each of these programs running one at a time on such a multitude of systems and difference of hardware that exists - my compliments go out to the Developers of both of these useful programs, regardless]

To try to be a little more specific, perhaps it is 'working' because there are functions/calls that these programs are doing, that are actually conflicting with each other - but they do so in such a fashion, that the end result is that they each stake out their territory and 'dont mess with each other' - each working in their own little Overlay or Recording areas, each performing their programmed functions, but with a sideways eye held in the direction of the other applications...

Regardless of how this Technomancy is working [remember it was even more 'odd' initially, with having to run Bandicam for some reason, at the same time], I tested it with multiple games now and it appears to be a repeatable process with reliable output (as long as you don't look at your computer too long in the eye region) - thus, I wanted to share it here with you all.


Games The Above Procedure Was Tested With: 

DNW = Did Not Work
AB = can have MSI_AB running already (before game is started)
22 = Error 22 was experienced (intermittently) 

  • Minecraft
  • Battlefield 4
  • Battlefield: Hardline
  • Planetside 2
  • Just Cause 2
  • World Of Warcraft
  • Simcity (2013)
  • Hitman: Absolution
  • Zombies Monsters Robots
  • Left 4 Dead
  • Left 4 Dead 2 - AB
  • Team Fortress 2 - AB
  • Counter Strike: Global Offensive - AB
  • TESV: Skyrim - AB
  • Batman: Arkham City - AB, 22
  • Tomb Raider (2013) - AB
  • Torchlight - AB
  • The Secret World - AB
  • Need For Speed World - DNW
  • Rollercoaster Tycoon 3 - DNW (reliably)
  • Plants Vs Zombies (Steam and Origin) - DNW  

[Edit/Update: I did not initially test Hearthstone at the time of writing this post, but I have played it some since - and felt I must come back here and add that, in my experience with playing Hearthstone while running MSI Afterburner, there have been many occurrences of crashing, both of the game itself and the Blizzard Launcher [have been crashing]... Whether it is something at the moment with Blizzard's software, something with Afterburner, or something with Windows 10 (as I have recently Upgraded to it) I cannot say - but I wanted to make sure to let you know that if this is occurring with you (crashing when running Hearthstone and MSI Afterburner together) that It's Not Just You™]


By the way, if on your system, you just can't get these two to play nice together (but want to make sure and run at least Raptr/GE in order to track your gameplay or use the Optimizer, etc) - don't worry, you can do most of the functions MSI Afterburner offers with similar [also free] programs... If you purchased a video card from some companies recently, you may have gotten a disc with a similar utility on it.

For instance, EVGA has PrecisionX (you may have gotten no disc though and will have to go to their offical website). Club3D (new to North America, but they have been 'across the pond' for a couple of decades now) has RoyalFlush. Both of these examples offer Overclocking, Overvoltage and Fan Control (and PrecisionX offers Screenshot Capturing).

AMD Gaming Evolved (Raptr) of course offers both Screenshot Capturing and Buffered Recording of gameplay [Quality Tests of these GameDVR recordings, in future articles, Coming Soon™!]; but if you want the extra features that MSI Afterburner offers - and want these two programs running at the same time (for whatever reasons you may have) - I hope the above steps work for you. Enjoy... and See You In The Game!


[**Tense Harmony is the phrase I am utilizing in this article, because it is a tentative, fragile working condition: I found that if I ALT+TAB'd out of a game, it could cause this whole house of cards to come crashing down [the game could crash]. If I was running the game in a Windowed Mode, and I clicked outside of it for some reason (to look up something in the Intertubes, etc), it could cause the game to crash. Basically, any sneezing or farting of any type near the computer could cause this Workaround to asplode. Remember, that initiallyin Testing, trying to figure this all out, I had to run Bandicam as well, Minimized and 'not doing anything' - I mean, what the frell? I normally wouldn't even recommend, as a Former IT Professional, running multiple-different-and-for-the-most-part-competing [game recording] programs, each with their own functions and overlays... heck, I could have been called a heretic and forced to do Late-Night Tech Support, if I was still working, for suggesting to run multiple programs that all do the same thing for goodness'sakes, heh... Anyway, thus my phrasing utilized herein. No matter what though, I hope it works for you, as it did for me.]


Saturday, April 04, 2015

Battlefield: Hardline - The Sabotage Gadget (A Mechanic Class Gadget Tutorial) [Video Tutorial]


I am having a ton of fun playing Battlefield: Hardline, when I can - but while I work on a much longer 'First Impressions and Screenshots' article for the blog, I wanted to share a short tutorial for Newer Players - something that I'm seeing asked in the game chat a lot - how to use the Sabotage gadget (the basics, how to use it, what it does, etc..).

Here then, is my first Video Tutorial for Battlefield: Hardline [hopefully the first of many!] 

How To Use The Sabotage (A Mechanic Class Gadget Tutorial)

[Recording utilities used, System specs, music/backing track for the credits,
and more, are all in the End Titles]


Enjoy and See You In The Game!

Wednesday, April 16, 2014

Quick Tip: Guild Wars 2 - How To Split Stacks Of Items


Just a quick tip for GW2 and those of us who were tying to split stacks of things, only to link them into Chat and 'shout' the item's link to people around us, the entire Map, etc. The way to actually sort things in a more private manner, is to hold down the ALT key and then drag the stack of items to an open slot. A dialog box should come up asking you how you want to split the stack of items (as seen in the example below):


Pressing the Shift key, as most know, will link the item in the chat box, and pressing Control, will link it and shout it out in Chat automagically - which is nice and embarrassing. I've seen some random linkages in the Chat Box [of things that aren't of any interest] so I know it isn't just me! I hope that this helps someone out and saves them from this atrocious "Faux Pas"...


See You In The Games!

Saturday, April 12, 2014

Guild Wars 2: How To Ride "The Train" of Queensdale (Champion 'Farming' Runs As A Group) Tutorial with Map


[NOTE*** As of April 15th, 2014 the changes to the game with the April 2014 Feature Pack update have altered The Train route somewhat - these changes will be updated in this map and article as they solidify into a commonly-agreed Route...
FURTHER UPDATES AT THE BOTTOM OF THIS ARICLE]


Ah, Guild Wars 2... I'm having so much fun with you, I can barely stop to start typing helpful Tips for others to read! Why are you so awesome? Oh, that's right, your creators and other ArenaNet buddies heard the nighttime wails of MMORPG players from other games around the globe and listened intently to our cries, wanting to soothe us softly by satisfying requests we players have made of all of those other games, didn't you? Oh, yes you did.  The result: a game I wish I had gotten into a lot sooner... Thank you, ArenaNet.


For those new to the game (or those who haven't done this before), in the beginning area of the Human lands of Kryta, there is a phenomenon called "The Train". After asking a few questions in-game and watching it a while, and then joining in on it off and on, on my own, I feel I can now safely share a simplified Tutorial on 'The Train' and explain to others (mainly newcomers to Guild Wars 2) what it is and how to be a part of it, if you wish to be.

Loading Screen for the Queensdale region, where 'runs' of The Train take place
(Click to see Full Size)


What is The Train?


'The Train' in Queensdale is, essentially, a cooperation of players moving and killing together as a group [in an MMO game?Whoknew?lol]. The Train targets a small number of Champion-type mobs [MOBile monsters], killing these same ones in a repeating cycle, again and again. The pattern [the "Route that The Train takes"] has evolved over time and differs little, no matter what server/shard you are on. Traveling and moving in collaboration with each other gives the result of faster kills, experience and loot for all those taking part (and sometimes the groups can get quite large). In Guild Wars 2, one does not need to 'Party' or form an 'official' group of any kind, in order to benefit from conquering enemies together [even when not following The Train]. Merely join alongside and help out a bit, and you too are now part of the Clique of Killing and can reap the rewards.


Even though The Train runs in the first leveling/adventuring area of the Humans (called Kryta), you can play any Race you wish, and then run/travel to the Human lands and be a part of The Train. There are no restrictions on Race interaction (no 'sides'; no factions, no clans, no tribes [to restrict players]) in Guild Wars 2. Any race can be created and interact with any of the other Races in Guild Wars 2. So, be whatever race you want to be, you can still head to Queensdale and get on The Train!


When 'on The Train' (following the group around and helping to kill the Champion monsters), you do have to be a high enough level to 'hit' the enemies in order to register as a 'contributor of the group' and benefit from the encounter (get experience, be able to loot, etc). With the Champion mobs being 'farmed' [by The Train] averaging Level 10 in this region (these are the only mobs that The Train goes after, remember), you may not be able to actually hit them until your character is about Level 7 or 8; so if you are playing a brand new character, do some starting Quests, World Events or your character's Storyline for a bit first.


Killing the Boar champion while on the Train in Queensdale
(Click to see Full Size)


If you are a 'Brand New' Player to Guild Wars 2, I strongly suggest doing that for the most part anyway (Quests and Storylines), as doing so, you will more easily learn how to control your character, fight battles, use your skills as you learn them, and learn to navigate the territories and develop your character as a whole.
The Train is, for the most part, a repeated cycle of killing [almost absolutely nothing but] a small number of Champion 'boss' style monsters (as in 5-6 of them, depending on the route The Train takes on your Server/Shard, remember it differs little) - and there have already been arguments all over forums and other websites as to whether relatively New Players should take part in it at all (and if it harms the gameplay/environment of newer players). I believe that this decision is up to each individual, as some people might eschew the practice completely until Level 80 (the current maximum level as of the time of this post), while other people will love the camaraderie and easy access to loot (you always get items comparative to your current level, whatever that may be, when the Champions die).
As with any game, there will always be people that will say a certain activity is too repetitive and boring, and there will always be people that will say it is a good source of 'loot', and there will always be people that will advise doing something else (like playing PvP or more PvE). I like to suggest, if people ask, that each person try Taking A Ride On The Train for themselves at least a few times, then judge whether they wish to continue doing it or move on to other things, leaving the choice up to each player.

[On a personal note for a moment, merely to address this matter that many people seem to argue about and state my own personal opinion, I myself enjoy roaming the lands of GW2 randomly, helping out NPCs and doing the little events found around the world. I play usually always play solo and that affords me the ability to change it up and do whatever activity I want, stop whenever I want (or if I get too tired physically and have to stop, due to my illness) and roam around taking [way too many] screenshots of the environs, gathering resources as I leisurely explore and discover the countryside. I often forget about the Storyline for my character - there is so much to do in the world; but I try to get in on it as I remember to and develop my character along with the story that is tailored for each Race. I do take a ride on The Train, but only as a 'something else to do for a change', not as my 'main leveling mechanic' or my 'main source for items'. I like to think this off-and-on approach allows me to enjoy The Train while not getting too bored of it too quickly, all the while being able to enjoy the game at the same time, and it is just 'another thing that I can do' in the huge game world of Guild Wars 2.]


Killing the Troll champion while on the Train in Queensdale
(Click to see Full Size)


How does one 'get on' The Train? 


First, I always suggest to others, to get the Waypoints that The Train uses first. This will allow you to quickly relocate and follow The Train, travelling to the next Champion that is to be killed. If you did not create a Human, travel to The Human Lands and simply run to the Waypoints to open them up on your map and register them so that they can then allow you to return to them/use them in the future and for Riding The Train.

Don't worry, there are only three main waypoints used in The Train's generally-used rotation (and it differs only slightly on some servers/shards [for instance, on Eredon Terrace, "The Bandit" is very rarely killed by The Train - which seems to be the main difference for The Route from other shards - however, since I have created my character on ET, this is the example I will use]). The waypoints used and the route generally taken are all shown in this graphic I have created of the map of Queensdale below.

The Game Tips And More Blog's Map of Queensdale and The Train Route as of April 2014 [Old Version]
(Click to see Full Size)


The Route that The Train takes usually runs like this (repeatedly):

  • Begin the Route from the upper right [the Double Orange Arrows on the map I created, above]
  • Kill the Boar champion in the hills there, NW of the Hunting Lodge
  • Fast Travel to the Vale Waypont and head into the caves just to the west
  • Kill the Troll champion inside the caves of Altar's Windings
  • Fast Travel to the Phinney Waypoint and head NW to a glade at the edge of the trees
  • Kill the Rotting Ancient Oakheart champion at the forest's edge
  • Fast Travel to the Krytan Waypoint and head NE, towards two large hills
  • Kill the Forest Spider champion on the larger hill, SE of the Hunting Lodge in a grove of trees
  • Run NW past the Hunting Lodge and up into the hills and wait for the Boar event again

A couple notes about the map: I made 'tick marks' (they look like little orange hyphens/dashes) that remind you of the order the champions are killed in and which Waypoint to take [-, --, ---, etc]. I managed to capture and keep the 'white dotted-line of travel', running around following The Train, so if you are a bit lost, try to re-create the white dotted path that you see on my map. To help with finding the Forest Spider champion on a hill SE of the Hunting Lodge (and NE from the Krytan Waypoint), I put a small orange "S" where it is normally encountered. Lastly, my server/shard does not kill The Bandit Lieutenant champion [and we may be the only shard that doesn't apparently], but if you wish to find him, he is in the Bandithaunt Caverns, N of the Vale Waypont.


The champion Boar shows up only after someone talks to Lodgemaster Carthage at the Hunting Lodge. There is a short event waiting period, then two hunters come out and slowly stalk their prey. Everyone usually waits in the hills to the NW of the Lodge and this can be a good time to go through your inventory, unpacking any goodies, salvaging, organizing, etc. There may even be some Banners nearby that can give beneficial Boons ["Buffs"], usually placed by some friendly Guild Member. Take a short break, get a drink - and get ready to jump back on The Train!


When you sit down and start to play a new gaming session, or if you have lost track of where to go next, you can always ask in Chat (/map) where The Train is at that moment, to know where to 'get on' (to join in). Most people simply type, "Train?" or ask "Where is the train now?", and usually some kind soul will answer and state what stop The Train is at (what champion they are killing), or where they are heading to, at that moment. Common answers are, "Boar" or "Spider is up" or "waiting on Troll" or "at Oak", for the various champions (it may differ slightly on your server, but not by much). Sometimes, a helpful person will suggest, "Head to __some champion__", which means that the one they are currently fighting is almost dead, so you 'might as well head to the next one'.


Killing the Oak champion while on the Train in Queensdale
(Click to see Full Size)


A few things to keep in mind as you ride The Train are: you have to be able to hit the mob in order to be able to loot it at all, therefore you may have trouble if you are much lower than level 7 or so (the mobs are Level 10). Loot will drop that is around your character's level, no matter what it is, so you can usually use it right away or soon. The Boar portion of the Route takes a little bit to get started and sometimes people will say phrases like, "Boar is Walking" or "Hunters are Walking" or "Boar Starting" and so on, to let everyone know, who were most likely just standing around waiting or AFK, that the event is beginning. You can gather Resources that are around (mine veins, gather plants/food, cut down trees) or that you pass by, on your way to the champions, just don't fall too far behind if the group is large - they can start to kill these Champions pretty darn fast - and you might miss out on the Loot Drop entirely!


Killing the Spider champion while on the Train in Queensdale
(Click to see Full Size)


That's it! Try not to bore yourself with repeating this excessively, by the way. Have fun, enjoy the loot and camaraderie of fellow GW2 players; but if it starts to become boring, go back to your character's story, pop in for some PvP or even do some Gathering, enjoying the landscape and beauty that is Guild Wars 2.


[UPDATE 1*** As of April 23rd, 2014 there seems to still be a lot of confusion as to the accepted/overall Route that The Train should take. There have been many arguments over what order the train will travel in and opposing groups will perform the run in awkward manner to each other. As a result, 'finalized' changes to this map and article will be delayed, until the community can solidify a pattern/route for The Train.
For now, "the basics" of what the Train is and does are secure and remain the same as this article. The Train may still run on your server/shard in the same manner, in general. Enjoy these aspects of this post, for now]

[UPDATE 2*** As of May 3rd, 2014 although there is still a bit of debating as to what should be a 'standard route' for The Train to take, a general consensus seems to be forming and this map and article will be redone and/or updated Soon™]

[UPDATE 3*** As of June 2014, although there is still some debate that occurs (mainly because someone gets to Oak 'early' and kills it on the group), most of the consensus appears to be this route: 
Boar-Troll-Bandit-Oak
I am working on a new, updated version of the map and will insert it here when finished.
For now, the rest of the information of this post (how to follow the train, etc.) is still valid and hopefully found helpful, for those who are interested in knowing what The Train Of Queensdale is and how to do it]


See You In The Game!

Monday, December 30, 2013

Guild Wars 2 - How To Complete The Winter Wonderland Snowflake Jumping Puzzle of Wintersday (Tips with Video)


If there were an award for Most Frustrating Event of 'winter-timey' events of this season, the Winter Wonderland snowflake-jumping puzzle in Guild Wars 2 could arguably win the snowflake-shaped trophy. I'm all for getting presents to the eager kiddies, but I can only fall to my death so many times before I am reaching for the Scotch and caring less and less whether I get their gift-wrapped socks to them or not anymore. In fact, I'm doing this for ME now, for the Achievement... oh sorry, Tips and such, yes, here we go...

In Lion's Arch, near the display of presents and candy canes, speak with the Festive Youth (the map will have a red/white mint on it that says Winter Wonderland) and choose to brave the freezing peaks.

[The auto-kicker is set very low in this region - take care not to spend much more than a miunute standing still/away from keyboard or you will be 'disconnected due to inactivity']


Inside, there are three paths to choose to jump to your death get the kiddies their presents by: a path marked by two Quaggan, a path with two Snowmen and a path with Gingerbread Men. They are all similar and all three will eventually converge into a center point marked my giant mints as platforms and Toymaker Trixx warming himself by a fire. Warming yourself is what you'll need to do - and fast - as the more time you spend jumping around on the snowflake platforms, the more damage you will take from the exceedingly-cold environment. Once you get past the questions of why they just didn't build a causeway lined with intermittent fireplaces or just teleported you past this area, you can start to jump your way up the snowflakes into the white beyond, hurdling candy cane rungs on the way.

The Winter Wonderland area of Wintersday in Guild Wars 2 as it appears in Winter 2013,
feel free to use it as a winter wallpaper!
(Click to see Full Size)

Since each path is similar and eventually end up in the same spot (the fire with Trixx to talk to), choose whichever one you feel is the easiest (or get used to the quickest). After a few hundred falls, I settled on the far right one, the one with two Quaggan. There are a few large jump gaps and two sets of candy cane rungs to navigate, but I found once I got the hang of jumping the flakes and canes, I could get to the gifts [the second half] almost every time. Here are some jumping tips, but first, one that is most important in my opinion: disable your dodge/evade in the Options.

Opening the Options Menu, in the Winter Wonderland area of Guild Wars 2
[Quote from 'Forceome': "agh this is so hard can't get past the first part"]
(Click to see Full Size)
To disable the Double-Tap-To-Evade, hit Escape or click on the Gear icon in the upper left, then in the Game Menu that pops up, click on the Gear icon again for the Options. In the first window that opens, there should be checkboxes at the bottom. Simply uncheck (if there is one) the Double-Tap to Evade option to disable it, for now.
In the Options Menu, adjusting the Double-Tap to Evade setting in the Winter Wonderland area of Guild Wars 2
(Click to see Full Size)

This is important for this jumping puzzle because, as you correct your character's position on the platforms, or hit a key twice in excitement as you move around, disabling this will stop you from hurtling yourself off of snowflakes and mints or into oncoming snowboulders later (that's right not snowballs, snowBOULDERS).

After disabling that option, the rest of the game is mostly getting used to the jumping:

  • I suggest zooming out a little, to see the flakes ahead of you a bit easier. Also, I suggest having a viewing angle of about 45degrees or sharper down towards your character. It is easier to gauge distance this way, instead of seeing 2+ snowflakes ahead of you in a flatter, more restrictive view that doesn't show you just how far you have to jump or where the next snowflake is, as clearly
     
  • Get your hands in a comfortable position and have lots of room to move your mouse (if you do not have your sensitivity up high). As there is a time-limit involved, you will be spinning your mouse around quickly to navigate the turning angles and giving your mouse more room to move around may help in not bumping into anything and stopping it from being able to turn your character
     
  • Jump as late as possible for the larger gaps. Start to move towards the edge of the snowflake in the direction you want to go and press AND HOLD the spacebar to leap as far as you can
     
  • Find out which way of stopping your forward travel while in the air is easiest for you. You may find that letting go of the spacebar is easier (when you need to just drop down or drop quicker so you don't overshoot a platform). For me, I found that while holding forward and jump to leap through the air, letting go of the W (forward) was easier for me, so that's how I'll explain it in the following tips
      
  • For smaller platforms (snowflakes, mints, gifts, etc), I hold my spacebar down as I leap towards it, and as I come over top of the platform, I let go of W when centered over it, so that I basically drop down onto it perfectly, without overshooting or getting too close to the edge. This also leaves a little bit of a run-way to build up a jump to the next platform, whatever it may be
      
  • Although it might feel good to get a long chain of jumps together in a row, I suggest not getting into this habit too much, as the twisting paths and changes in gap spaces make it harder the longer you try to keep your hands in the same position and not 'resetting' your hands on the keyboard/mouse. I found it was easier to get past the snowflake portion [the entire first half of the game] if I let my hands reset often, even if I did not feel rushed or could keep going in one long jumping chain. It gives you a second to breathe and reset your hands and refocus
     
  • Speaking of focus, when you find your eyes starting to wonder a bit (there is a lot of nice stuff to look at and your health going down is unnerving and distracting of course), try not to look at your health. This takes your eyes away from the platforms and stutters your concentration. Yes, your health is going down slowly and it will, as long as you are not by a fire, so just let it do so - and if it is getting close to the end (it will as you get close to the Mints middle part) try not to look at it, as it will take precious seconds away from your forward movement and focus. You will eventually die from the cold, if you do, just let yourself die and you'll get a chance to start over, don't look at anything on your HUD if you can
     
  • I found navigating the candy cane rungs easiest by doing this technique: I would hold the space bar down and I jumped straight up and then I would tap the forward key (W by default), holding them both for one second, then letting both of them go. This would launch me up, then forward a bit, then drop down, right on the next rung/cane. [Hopefully, this old-school 'hold-a-then-b' style of jumping will help you past those treacherous treats]
     
In the middle, once you pass the ungodly snowflakes, there is the toymaker Trixx, awaiting your decision as to whether you want to try for extra prizes or take a consolation prize at this point. There is also the choice to give up a chance for bonus prizes by starting at this spot again if you fall when jumping from here to the end. Note that this does not allow you to ALWAYS start from here, it only gives you TWO chances to fall and start from this mid-point. Once those are used up, you will get forcefully placed back at the start of this Wonderful Wonderland of Woe.

In the second half of the puzzle, there are a scattering of gift boxes to jump on, then some mountain paths with snowBOULDERS rolling towards you. If that isn't enough pressure, there are also gusts of wind from large "friendly" snowmen and icicle missiles that drop down on you, all while you try to climb up the mountain pathway. Some tips for this section are:


  • Although noone really knows how the gift-boxes work and what triggers them (some have said they are a fixed pattern, but they do not seem so and some have said it's if others touch them first, but I have seen boxes pop and disappear without anyone touching them), it does appear that if one person goes, you can go next over the ones that did not explode; but if a group of people go, the gifts go explode-crazy and I suggest waiting until they reset
     
  • Don't just frantically tap spacebar and think it will work all the time on getting past these gifts. There are gaps between some of them and some will explode in front of you - so you must then adjust and hold the spacebar to get over the new gap. [I could have sworn wildly tapping the spacebar worked far better closer to the start of this event, but it seems it does not do so anymore]
     
  • Once past the gifts, watch out for a gust of wind as you cross a large mint and hop down onto a candy cane bridge. Then, move onto the large mints on the side of the mountain paths, as snowBOULDERS will be coming down at you Indiana-Jones-style
     
  • As you avoid the boulders and get onto the side mints, watch out also for glowing rings of fire on the ground, signalling an Area-Of-Effect incoming and stay out of the rings [It seems as though it is a giant icicle that drops down on the spot, but I have not paid enough attention to it to see exactly what it is yet]

Finally, at the end (watch out for one last snowBOULDER), are a pile of spilled gifts to the right that you must jump across to leap into the exit (a huge glowing gift box portal). The way that I prefer to do this last portion is shown in this animated GIF:


Once you jump into the huge glow and come out the other side, enjoy the rewards that await you and settle gently into the idea that you only have to do all of this 19 more times to get the Achievement!

Don't worry, it can be done... Along with some of the tips covered above, here is a full Playthrough [with embedded tip reminders] of The Winter Wonderland Jumping Puzzle of Wintersday:


Good Luck with it - hopefully these techniques will help you out a bit - and See You In The Game!


Sunday, December 22, 2013

Planetside 2 - How To Find Snowmen (Winter Event) Known Facts, Tips and Suggestions


[Update: Note that although these Tips And Tricks noted herein have been noted to be of note during the first year of note in this notable noting, they have been tested to be valid for successive Winter Events, meaning that these Tips are still viable and applicable and other terms that end in -able for following Winter Event years. Enjoy!]


 Merry Auraximas!


For those playing Planetside 2 at this time of year, there is a Winter Event from SOE going on, that involves hunting snowmen in the blowing snowdrifts of the continent, Esamir. Killing 10 of these somewhat-rare snowman spawns earns you a new Title for your Soldier. Killing the far-more-rare Golden Snowman unlocks a Golden Hood Ornament instantly! This post is a collection of tips, strategies and ideas to help you do these very things this winter season. But first, an introductory video to the Winter Events, from the Official Planetside 2 Channel:


Known facts about the Snowmen:

  • The elusive Snowmen are not quite as tall as a human/soldier, but they are definitely not "small" - the main problem is that they are...white - on a continent of snow. [They are about 2/3 the height of a player/soldier] 
  • To help with spotting them, they have NC gloves stuck in the sides of them, a TR hat put on them and a VS stylish scarf draped around their necks knife as a nose 
  • The snowmen cannot be run over, spotted, or their visibility increased by using thermal vision, as they are snowmen and do not have souls are cold [they did appear stark white on night vision however, in my tests] 
  • They do not take many bullets to kill, they seem to take about the same damage as a regular player/soldier. For instance, in one test, a snowman was done in by two knife/melee hits [they are not excessively hard to kill] 
  • They are somewhat-random spawns. They seem to appear at the same locations, but the spawn timers are unknown
  • They can be found in groves of trees, near rock formations and even in the nooks and crannies of building structures, but only on the Esamir continent [there may be a queue in your region/server primetime playtime]
  • There are two types of Snowmen: Regular Snowmen and Golden Snowmen. They both seem to be able to appear on the same spots (share spawn points), as some have even reported that one type of snowman was 'inside' another type of snowman (they were 'on top' of each other/shared a spawn point)
  • The main difference between the two types of snowmen is that Golden Snowmen are far more eXPerience, reward a Hood Ornament upon "killing", and it seems that there can only be one Golden Snowman on the continent in existence at one time - all of this making the Golden Snowman a much more rare (but rewarding!) find

Snowman found in grove of trees, not far from a road, with some rocks around


Tips and Suggestions:

  • Although a Flash is fast and versatile, I suggest trying a Harasser, due to the difference of having a 360° rotating camera, while still being fast and relatively easy to steer/handle (and it can 'power' over some hills that the Flash cannot). You can also switch to the 2nd seat (hit the F2 key on your keyboard by default) and use the mounted weapon, even if you did not (or cannot) purchase any vehicle upgrades or add any weapons at all [the Flash would require a weapon-add upgrade] to kill found Snowmen (and contesting enemies)
     
  • You can use an empire-specific fighter (jet), but it has been reported that the snowmen cannot be seen from very far away (and some are under overhangs, etc) so this makes it somewhat more difficult if it is true, even with the difference in travel time.. [I have not tested this bit of info at this time]. You'll have to make that decision for yourself. Many people have reported flying around (low to the ground) has been fruitful for them
     
  • All classes have their strengths with this event [no doubt thought of by the developers]: Infiltrators can scan a wide area with their scopes, sniping the snowmen from a distance and can cloak if threatened (or fight). Engineers can refill their own ammo and repair their transport vehicle if it becomes damaged. Light Assaults can utilize their Adrenaline Pump ability to sprint faster to their destinations, as well as jump-jet up to higher points and over rocks [I prefer the Light Assault for these reasons, but the choice is up to you] - however this is just an example of some of the benefits of some of the classes for hunting
     
  • They appear at the sides of roads a lot [I ran into most of my snowmen this way, driving down roads and veering off when I saw a grove of trees or an isolated rock grouping]. Rocks seemed to have far less snowmen [for me], but there have been reports of people finding them in rock formations and on mountains [I found a couple, in rock formations; but since many of them seem to be easily found from the road, just driving around on roads and keeping a sharp eye open may be the 'fastest' way, in my personal opinion, at least, when starting out hunting, at first]
     
  • As you can see from the maps in the next section below, they are spread out pretty well - there are lots of places to at least have the chance to find one. Of course, it will help [be easier] if your faction controls the area you are hunting in; but even if not, it's a chance to engage the enemy for fun (or if you are less inclined to battle, you are allowed to create a soldier of a different faction on the same server, so you can choose one that 'owns' the territory you wish to go hunting in)
Snowman found by the edge of a road [I personally ran into most of my Snowmen this way, finding them along the sides of roads]
Snowman found near edge of road, while driving around in Harasser


Community-Created Maps:

Here are a couple of maps that were posted on the Official Planetside 2 forums (shared with cartographers' permission):

[This map has been added to since this version by many helpful people at the SOE Planetside 2 Forum here: https://forums.station.sony.com/ps2/index.php?threads/esamir-snowman-spawn-map.163625/ ]
Esamir Snowmen Locations, map by Slaudog
All markers can be either Snowmen or Golden Snowmen, circles mean more than one was found close to another
[Later versions of this map have more contributors, see the thread for updates]
(Click to see Full Size)
Esamir Snowmen Locations, map by MaxDamage
(Click to see Full Size)


Snowman somewhat-hidden by brush within a grove of trees, not far from a road
Snowman found near base structure, alongside a road
Snowman "kill", showing eXPerience gained. With the Double XP Weekend plus a 10% bonus, it seems that a Normal Snowman will give 500XP


With the great eXPerience that the Snowmen give, if you are a lower level (Battle Rank) you can literally rank up just from popping these party piles of pudgy powder [This one was found right next to the road]


I have already achieved the custom soldier Titles for a couple of my Soldiers since this event began and have started to help others find them and wanted to collect everything I've learned so far together in one post. Hopefully, you will find this information helpful in seeking out these little fellas, especially if you are just starting out - now get out there, start hunting, good luck - and See You In The Game!

Wednesday, July 17, 2013

Game Tip - Rollercoaster Tycoon 3: Changing The Game Display Resolution


Just a quick tip for Rollercoaster Tycoon 3 (and any Expansions you may have installed): To change the resolution to match your monitor's native rez or to bump it up higher, simply edit the Options.TXT file found at

Computer > [WindowsDrive] Disk C > Users > [UserName] > AppData > Roaming > Atari >RCT3

(See the screenshot just below, my 'username' was "Tr")
The location of the Options text file that allows you to edit the resolution the game will run in (Windows7)

Another way to get to this location in Windows is:
  1. Click on the Start button, then click on Run [or press 'WindowsKey+R']
  2. In the command box that comes up, type "%appdata%" (without the quotation marks) and it will open Windows Explorer at the folder >Roaming - then all you need to do is navigate into the Atari folder, then within that, the RCT3 folder - and you will be at the same location as the above, where the Options.txt file can be found
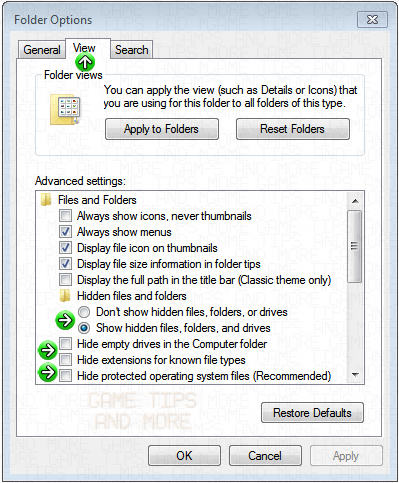
Note that you may have to show Hidden Files in Windows in order to see some of the folders (such as AppData). To do this:
  • In Windows Explorer, click on the Tools pulldown menu and select Folder Options.
  • In the Folder Options window, click on the View tab
  • In here, under the Advanced Settings section, where it says 'Hidden files and folders', select the 'Show hidden files, folders, and drives' Radio Button
  • Also, take out the checkmarks for the next 3 'Hide' selections (Hide empty drives, Hide extensions and Hide protected files)

Here's what the checkboxes, etc look like:

After the steps above, you should be able to now navigate to the RCT3 folder that has the Options.txt file with the resolution setting inside (open it with Notepad or your favorite text editor). You'll see the setting near the beginning of the file. Simply change those numbers to the resolution you wish to use - that's all.

Have fun and See You In The Game!